
In this tutorial, I will show you how to set up a business email account (like eszter@webesti.com) in Gmail so you can manage all your emails from there.
Before you begin
- Create your work email address. First, set up a professional email (e.g., info@yourdomain.com) through your hosting provider. This is the address your clients will see. It’s usually straightforward — in your hosting control panel, look for something like “Configure business email” or “Add new email account.” Be sure to save all the details, including the email address, password, and server settings — you’ll need them later when configuring Gmail.
- Create / Use a dedicated Gmail account. I recommend creating a separate Gmail account for your business emails to keep things organized. Mixing personal and work emails in one inbox can get messy.
- A couple of important notes about Gmail:
Google Workspace users: If you’re using a Google Workspace account (i.e., Gmail with your custom domain), the option to “Add an email account” might not be available. In that case, contact your Workspace administrator to enable it.
Email delivery may be delayed. Gmail fetches emails from your hosting server at intervals, so messages may not appear immediately. This is normal behavior.
Steps
- Go to the inbox of your business related Gmail account, and at the top right click on the gear and then on “See all settings”.
- At the top, click the Accounts and import or Accounts tab.
- In the “Check mail from other accounts” section, click Add a mail account.
- Type the email address of the other account.
- Click Next and you will see this:
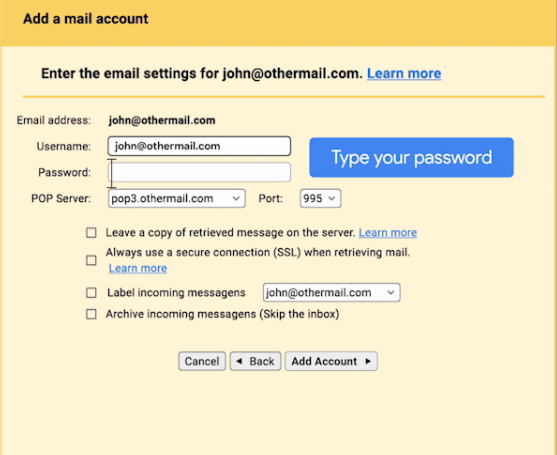
6. Here fill in the data that you got from your hosting account where you created your business email address:
Username:
Password: The password of the account you created on your hosting platform
POP server: mail.yourdomain.com or whatever hosting gave you
Port: 995
Checked: Leave a copy of the retrieved message on the server
Checked: Always use a secure connection (SSL) to retrieve email messages
Click on “Add account
7. Now the menu will ask you if in addition to receiving emails from info@yourdomain.com, you also want to send emails from this account from Gmail. If you are interested just click “Next”. (YES)
8. In the “Name” field put the name you want to be seen when someone receives an email sent by you from info@yourdomain.com. Then check the box “Treat it as an alias” and click “Next step”.
9. Outgoing mail settings comes next. Again, fill in the data as follows and click on “Add account”:
SMTP server: mail.yourdomain.com
Username: info@yourdomain.com
Password: The password for the account info@yourdomain.com
Port: 465
Checked: Secure SSL connection
Done! 🙂 Now Test Your Setup!
To make sure everything is working properly:
- Send a test email to your new business address from another email account and check that it arrives in your Gmail inbox.
- Reply to that email to confirm your outgoing mail works and shows your business address as the sender.
- Check for delays and confirm the email looks professional (signature, sender name, etc.).
- Check your spam folder. If the test email ends up in spam (either incoming or outgoing), it could indicate an issue with your domain’s DNS settings (like missing SPF, DKIM, or DMARC records). In that case, check your hosting provider’s documentation on setting up email authentication.
- Review the email appearance. Make sure your display name, signature, and formatting look professional.
If anything doesn’t seem right, double-check the settings you entered — especially the server info and password.
You’re All Set!
Your business email is now up and running through Gmail — professional, organized, and ready to go!
If you found this guide helpful, feel free to share it with others who might need it.
Still having issues or questions? Reach out — I’d be happy to help!